Published on: April 7, 2026
22 min read
Streamline test management with the SmartBear QMetry GitLab component
Learn how to automatically upload test results from GitLab CI/CD pipelines to SmartBear QMetry Test Management Enterprise using the CI/CD Catalog component.


In modern software development, test management and continuous integration are two sides of the same coin. DevSecOps teams need seamless integration between their CI/CD pipelines and test management platforms to maintain visibility, traceability, and compliance across the software development lifecycle.
This becomes even more important as testing scales across automated pipelines, where execution data is spread across tools and harder to track in one place.
For organizations using GitLab for CI/CD and SmartBear QMetry for test management, manually uploading test results creates friction, delays feedback loops, and makes it harder to maintain a reliable, centralized view of testing.
What if you could automatically publish your JUnit, TestNG, or other test results directly from your GitLab pipeline to QMetry with just a few lines of configuration?
That's exactly what the new QMetry GitLab Component enables. This reusable CI/CD component, now available in the GitLab CI/CD Catalog, eliminates the manual overhead of test result management by automatically uploading test execution data to QMetry. This is an AI-enabled, enterprise-grade test management platform that brings together test planning, execution, tracking, and reporting in one place.
As a centralized system of record for testing, QMetry helps teams understand coverage, track execution, and make more reliable release decisions.
In this guide, you'll learn:
- How to set up the QMetry GitLab Component in your pipeline
- How to configure automated test result uploads
- Advanced configuration options for enterprise requirements
- A real-world aerospace industry use case
- Best practices for test management automation
By the end of this article, your GitLab pipelines will automatically feed test results into QMetry, giving your QA teams instant visibility into test execution and helping them make faster, more confident release decisions.

Why integrate GitLab with QMetry?
Before diving into the technical implementation, let's understand the value this integration delivers:
Eliminate manual test result uploads
DevSecOps engineers and QA teams no longer need to manually export test results from CI/CD runs and import them into test management systems. The component handles this automatically after every pipeline execution.
This reduces manual effort while ensuring test data stays consistent, up to date, and easy to access across teams.
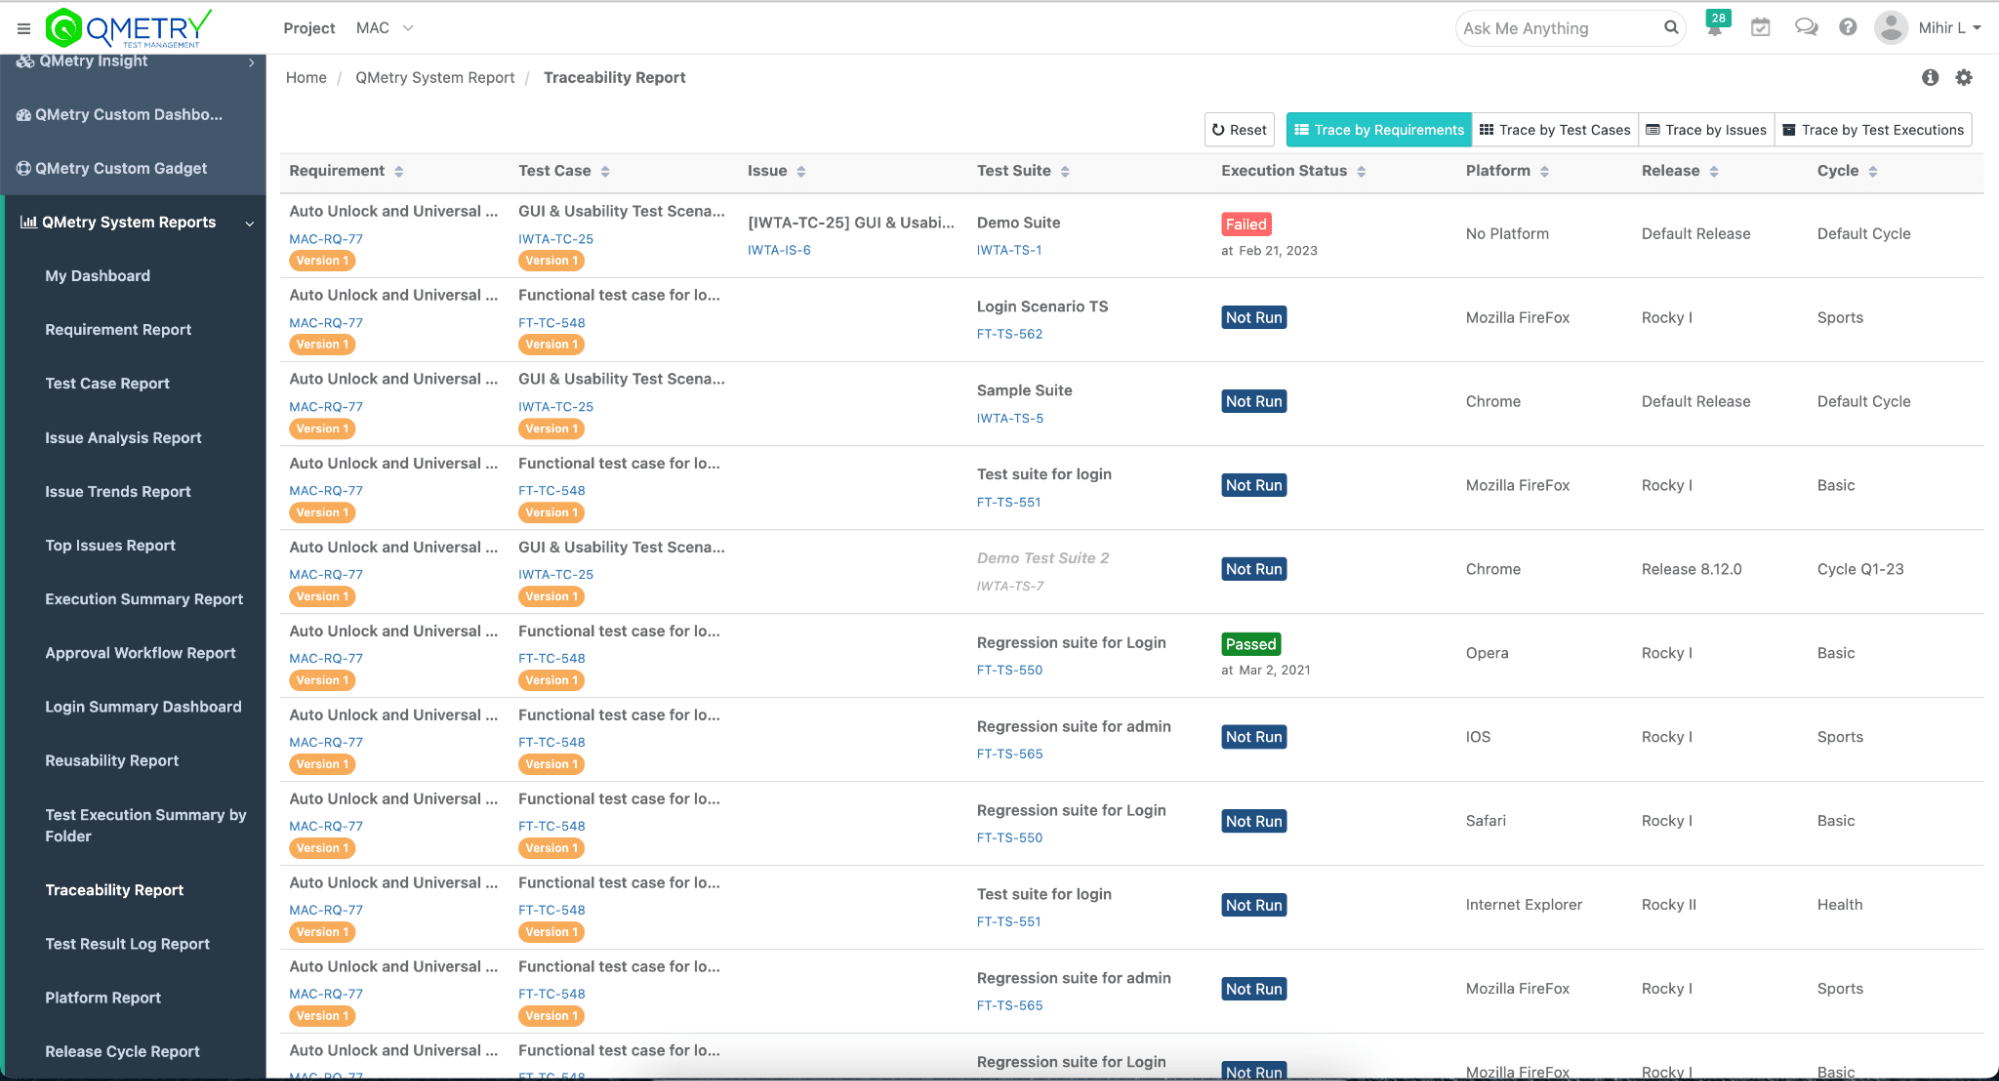
Enable end-to-end traceability
By connecting GitLab's CI/CD execution data with QMetry's test management capabilities, teams gain complete traceability from requirements through test cases to actual test execution results. This is critical for regulated industries like financial services, aerospace, medical devices, and automotive, where audit trails are mandatory and regulatory compliance depends on demonstrating complete test coverage.
It also gives teams a clearer view of coverage and risk across releases, making it easier to understand what’s been tested and what still needs attention.
Accelerate feedback loops
Automated test result uploads mean QA teams, product managers, and stakeholders see test execution results immediately after pipeline completion – no waiting for manual data entry or report generation.
With faster access to results, teams can act immediately, reduce delays, and make quicker, more informed release decisions.
Support compliance and audit requirements
For organizations in regulated industries, maintaining comprehensive test records with proper versioning and traceability is non-negotiable. This integration ensures you can document every test execution properly in QMetry with links back to the specific GitLab pipeline, commit, and build.
This creates an audit-ready record of testing activity without adding manual overhead.
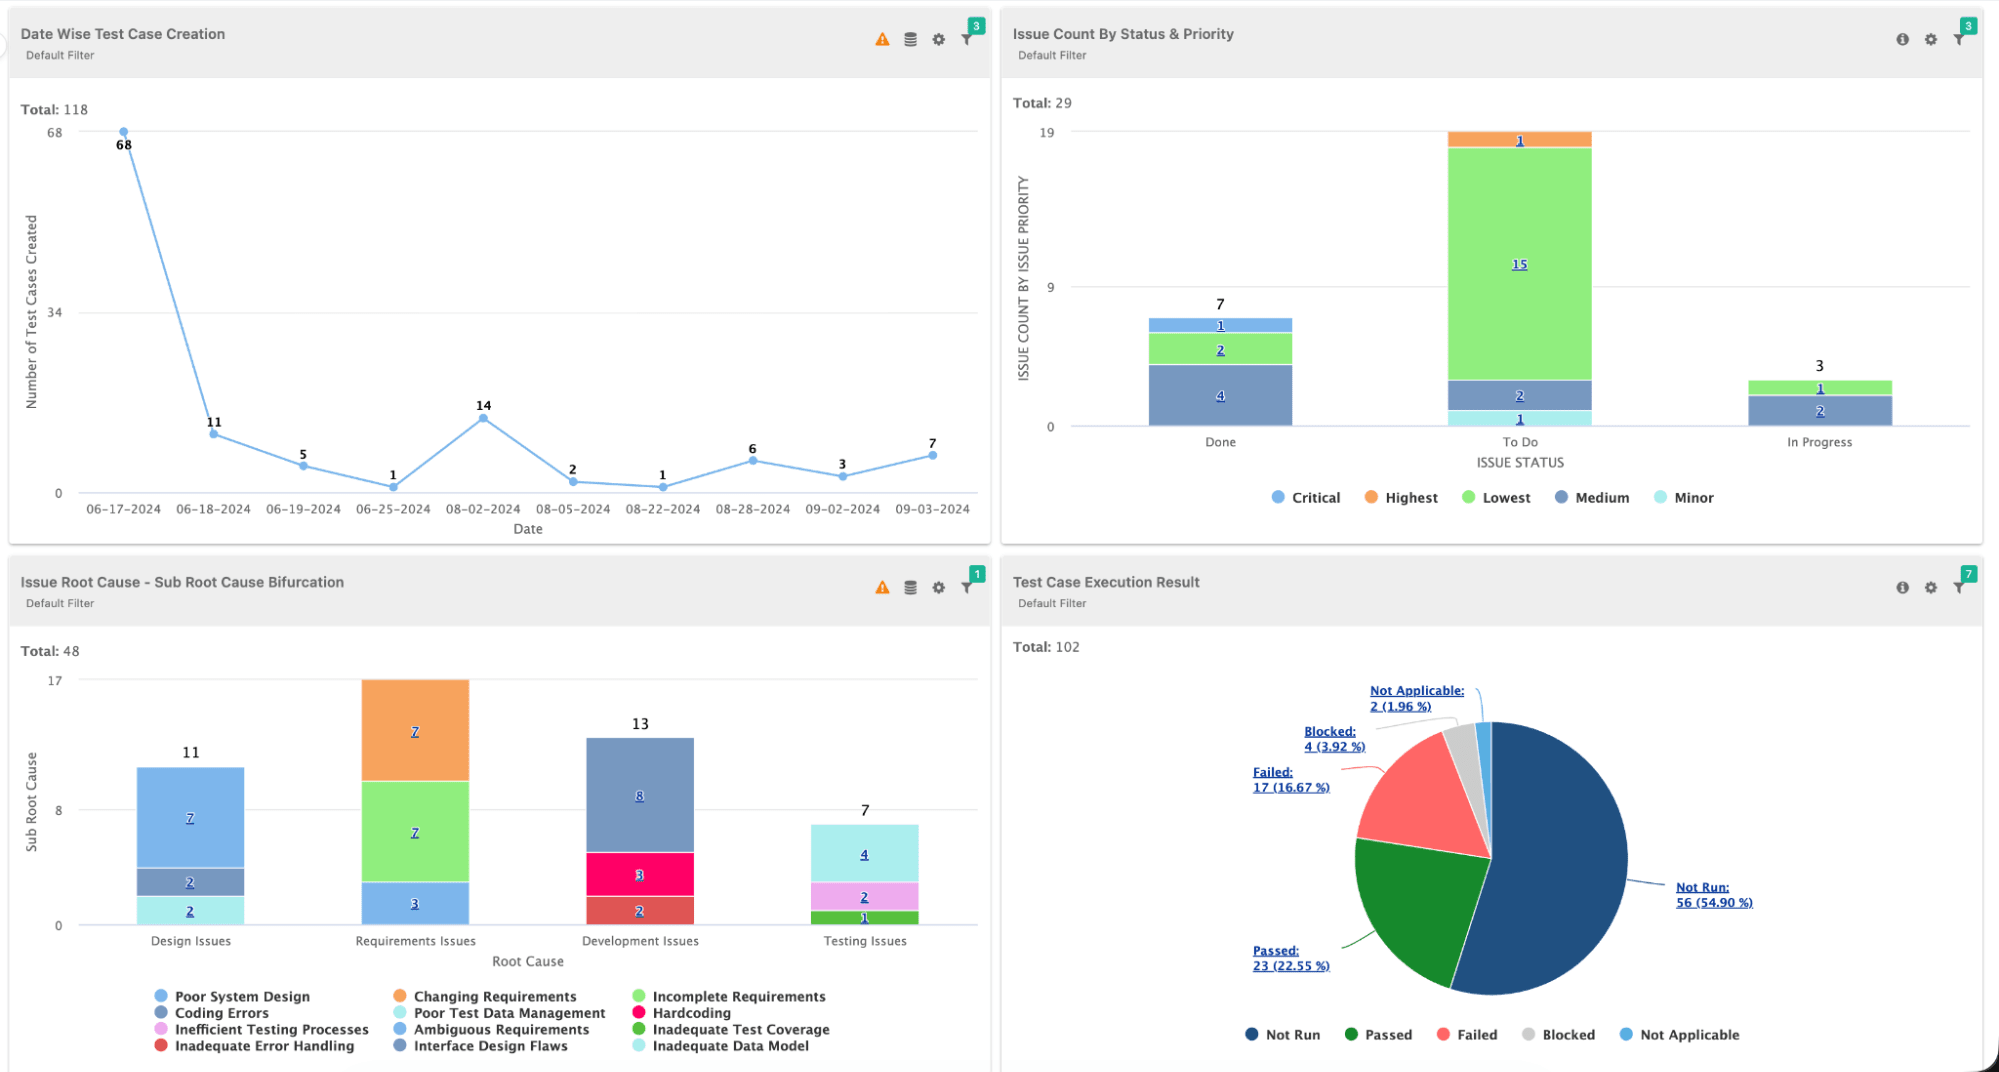
Leverage AI-powered test insights
QMetry uses AI to analyze test execution patterns, identify flaky tests, predict test failures, and recommend optimization opportunities. Feeding it real-time data from GitLab pipelines maximizes the value of these AI capabilities.
With continuous data flowing in, teams get more accurate insights and can focus their efforts where it matters most.
About the GitLab and SmartBear partnership
This component represents a growing partnership between GitLab and SmartBear to better connect CI/CD execution with test management in a single workflow. SmartBear brings deep expertise in testing, API management, and quality automation, while GitLab provides the most comprehensive AI-powered DevSecOps platform. Together, they help teams streamline how testing fits into the development lifecycle while maintaining the quality, security, and compliance standards their industries require.
Whether you're managing test execution for aerospace flight control systems, financial services platforms, automotive safety applications, or medical device software, the combination of GitLab's CI/CD capabilities and QMetry's test management gives teams a centralized, reliable view of testing across the lifecycle, helping them track execution, maintain traceability, and make more confident release decisions.
What you'll need
Before getting started, ensure you have:
- A GitLab account with a project containing automated tests that generate test result files (JUnit XML, TestNG XML, etc.)
- QMetry Test Management Enterprise account with API access enabled
- QMetry API Key generated from your QMetry instance (we'll cover this shortly)
- QMetry Project already created where you will upload test results
- Familiarity with GitLab CI/CD, including understanding of basic
.gitlab-ci.ymlsyntax and pipeline concepts - Test suite configuration in QMetry (optional but recommended for better organization)
Understanding the test result flow
Here's what happens when you integrate this component:
- Test execution: Your GitLab CI/CD pipeline runs automated tests (unit tests, integration tests, E2E tests, etc.).
- Result generation: Tests produce output files in formats like JUnit XML, TestNG XML, or other supported formats.
- Component invocation: The QMetry component executes as a job in your pipeline.
- Automatic upload: The component reads your test result files and uploads them to QMetry via API.
- QMetry processing: QMetry receives the results, processes them, and makes them available for reporting and analysis.
The beauty of this integration is that it happens automatically, with no manual intervention required once configured.
Part 1: Getting your QMetry API credentials
Before configuring the GitLab component, you need to obtain API access credentials from your QMetry instance. Here are the steps to follow:
1. Access QMetry settings
- Log in to your QMetry Test Management Enterprise instance.
- Navigate to your user profile (typically in the top-right corner).
- Select Settings or API Access from the dropdown menu.
2. Generate an API key
- In the API Access section, click Generate New API Key.
- Provide a descriptive name for the key (e.g., "GitLab CI/CD Integration").
- Set appropriate permissions. The key needs write access to upload test results.
- Click Generate.
- Copy the API key immediately as it will only be displayed once.
Important security note: Treat your API key like a password. Never commit it directly to your .gitlab-ci.yml file or store it in plain text. We'll use GitLab CI/CD variables to store it securely.
3. Note your QMetry instance URL
You'll also need your QMetry instance URL, which typically follows this format:
https://your-company.qmetry.com
or, for self-hosted instances:
https://qmetry.your-company.com
Make note of this URL because you'll need it in the next section.
Part 2: Configuring GitLab CI/CD variables
Now that you have your QMetry credentials, let's store them securely in GitLab. Here are the next steps to follow:
4. Navigate to CI/CD settings
- Open your GitLab project.
- In the left sidebar, navigate to Settings > CI/CD.
- Expand the Variables section.
- Click Add variable.
5. Add the QMetry API key
Configure the API key variable:
| Field | Value |
|---|---|
| Key | QMETRY_API_KEY |
| Value | Your QMetry API key from Step 2 |
| Type | Variable |
| Flags | ✅ Mask variable ✅ Protect variable (recommended) |
Click Add variable to save.
6. Add the QMetry instance URL
Add a second variable for your instance URL:
| Field | Value |
|---|---|
| Key | INSTANCE_URL |
| Value | Your QMetry instance URL (e.g., https://your-company.qmetry.com) |
| Type | Variable |
| Flags | (optional: Protect variable) |
Click Add variable to save.
Why use CI/CD variables?
- Security: Masked variables are hidden in job logs.
- Reusability: You can use the same credentials across multiple pipelines.
- Flexibility: It is easy to rotate credentials without modifying pipeline code.
- Access control: Protected variables are only available on protected branches.
Part 3: Understanding your test result files
Before integrating the component, ensure your tests generate output files that QMetry can process. Here are the next steps to follow:
7. Verify test output format
The QMetry component supports multiple test result formats. The most common is JUnit XML, which most testing frameworks can generate:
Example JUnit XML output (results.xml):
      <?xml version="1.0" encoding="UTF-8"?>
<testsuites>
  <testsuite name="Flight Control System Tests" tests="15" failures="1" errors="0" time="45.231">
    <testcase classname="FlightControlTests" name="testAltitudeHold" time="2.341">
      <system-out>Altitude hold engaged at 10,000 feet</system-out>
    </testcase>
    <testcase classname="FlightControlTests" name="testAutopilotEngagement" time="3.125">
      <system-out>Autopilot engaged successfully</system-out>
    </testcase>
    <testcase classname="FlightControlTests" name="testEmergencyLanding" time="5.892">
      <failure message="Landing gear failed to deploy">
        Expected: Landing gear deployed
        Actual: Landing gear malfunction detected
      </failure>
    </testcase>
    <!-- Additional test cases... -->
  </testsuite>
</testsuites>
Most testing frameworks generate this format automatically:
- JUnit (Java): Native format
- pytest (Python): Use
--junitxml=results.xmlflag - Jest (JavaScript): Use
jest-junitreporter - RSpec (Ruby): Use
rspec_junit_formatter - NUnit (.NET): Use
nunit-consolewith XML output - Go test: Use
go-junit-report
8. Confirm test artifact configuration
Ensure your existing pipeline saves test results as artifacts. This allows the QMetry component to access them:
      test:
  stage: test
  script:
    - npm install
    - npm test -- --reporter=junit --reporter-options=output=results.xml
  artifacts:
    reports:
      junit: results.xml
    paths:
      - results.xml
    when: always  # Upload even if tests fail
Key points:
artifacts.reports.junitmakes results visible in GitLab's test report UI.artifacts.pathsensures the file is available to downstream jobs.when: alwaysensures results upload even if tests fail.
Part 4: Integrating the QMetry component
Now for the main event – adding the QMetry component to your pipeline. Here are the next steps to follow:
9. Basic component integration
Add the component to your .gitlab-ci.yml file. The component should run after your tests complete:
      include:
  - component: gitlab.com/sb9945614/qtm-gitlab-component/[email protected]
    inputs:
      stage: test
      project: "Aerospace Flight Control System"
      file_name: "results.xml"
      testing_type: "JUNIT"
      instance_url: ${INSTANCE_URL}
      api_key: ${QMETRY_API_KEY}
Let's break down each input parameter:
| Parameter | Description | Example |
|---|---|---|
stage | Which CI/CD stage runs the upload job | test |
project | Your QMetry project name or key | "Aerospace Flight Control System" |
file_name | Path to your test results file | "results.xml" |
testing_type | Format of your test results | "JUNIT" (also supports: TESTNG, NUNIT, etc.) |
instance_url | Your QMetry instance URL | ${INSTANCE_URL} (from CI/CD variables) |
api_key | QMetry API key for authentication | ${QMETRY_API_KEY} (from CI/CD variables) |
10. Complete pipeline example
Here's a complete .gitlab-ci.yml example showing test execution followed by QMetry upload:
      stages:
  - test
  - report

variables:
  # Your app-specific variables
  NODE_VERSION: "18"

# Run your automated tests
unit-tests:
  stage: test
  image: node:${NODE_VERSION}
  script:
    - npm ci
    - npm run test:unit -- --reporter=junit --reporter-options=output=results.xml
  artifacts:
    reports:
      junit: results.xml
    paths:
      - results.xml
    when: always
  tags:
    - docker

# Upload results to QMetry
include:
  - component: gitlab.com/sb9945614/qtm-gitlab-component/[email protected]
    inputs:
      stage: test  # Runs in same stage as tests
      project: "Aerospace Flight Control System"
      file_name: "results.xml"
      testing_type: "JUNIT"
      instance_url: ${INSTANCE_URL}
      api_key: ${QMETRY_API_KEY}
11. Run your pipeline
Commit and push your changes:
      git add .gitlab-ci.yml
git commit -m "Add QMetry test result integration"
git push origin main
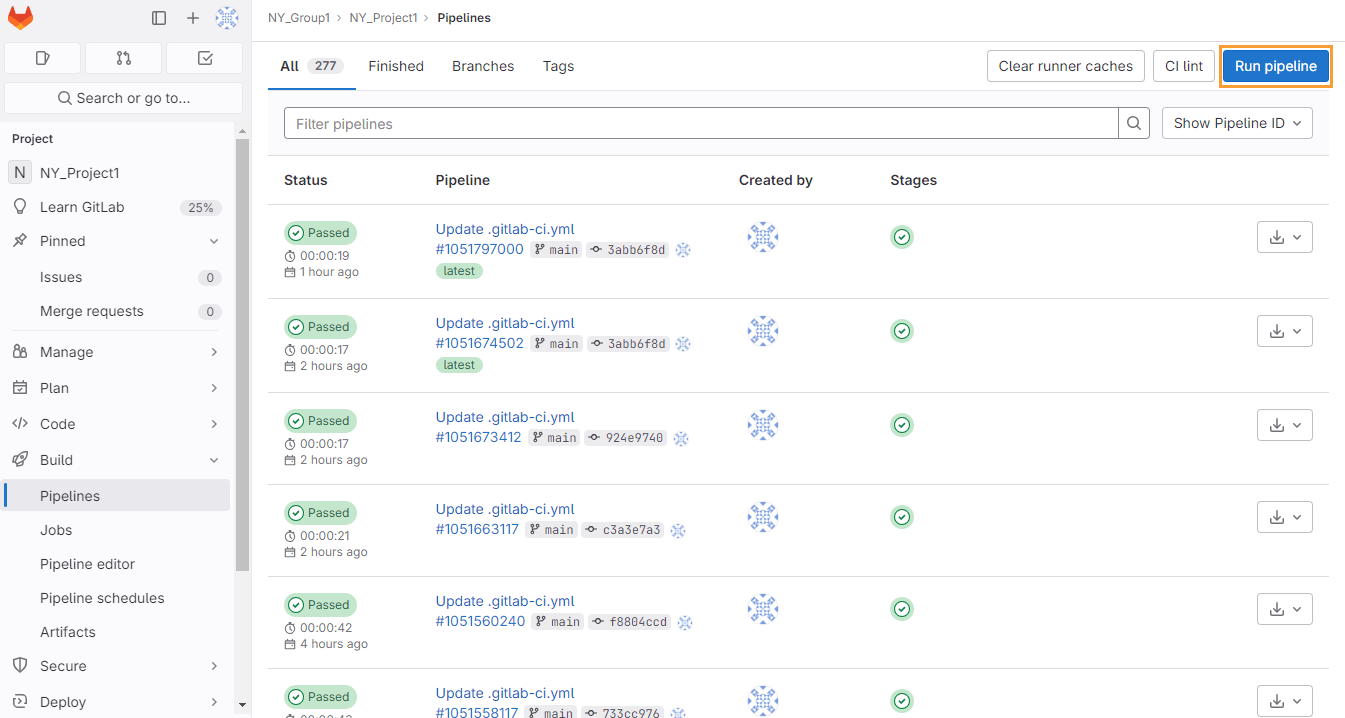
Navigate to your GitLab project's CI/CD > Pipelines to watch the execution.
12. Verify successful upload
After the pipeline completes, you should see:
In GitLab:
- A new job in your pipeline named
qmetry-import(or similar) - Job logs showing successful API communication
- Green checkmark indicating successful upload
Example successful job log:
      $ curl -X POST https://your-company.qmetry.com/api/v3/test-results/import \
  -H "Authorization: Bearer ${QMETRY_API_KEY}" \
  -H "Content-Type: application/json" \
  -d @payload.json

{
  "status": "success",
  "message": "Test results uploaded successfully",
  "results_processed": 15,
  "test_cases_created": 3,
  "test_cases_updated": 12,
  "execution_id": "EXE-12345"
}

Job succeeded ```

**In QMetry**:

1. Navigate to your project dashboard.
2. Check the **Test Executions** section.
3. You should see a new test execution with results from your GitLab pipeline.
4. Click into the execution to see detailed test case results.


## Part 5: Advanced configuration options

Now that you have the basic integration working, let's explore advanced configuration for enterprise requirements. Here are the next steps to follow:

### 13. Organizing results with test suites

For better organization, you can specify which QMetry test suite should receive results:

```yaml
include:
  - component: gitlab.com/sb9945614/qtm-gitlab-component/qmetry-import@1.0.5
    inputs:
      stage: test
      project: "Aerospace Flight Control System"
      file_name: "results.xml"
      testing_type: "JUNIT"
      testsuite_name: "Sprint 23 Regression Tests"
      testsuite_id: "TS-456"  # Optional: Use existing test suite ID
      instance_url: ${INSTANCE_URL}
      api_key: ${QMETRY_API_KEY}
When to use test suites:
- Organizing tests by sprint or release
- Separating regression tests from new feature tests
- Grouping tests by component or subsystem
- Creating test execution hierarchies for reporting
14. Configuring automation hierarchy levels
QMetry supports hierarchical test organization. Use the automation_hierarchy parameter to specify the organization level:
      include:
  - component: gitlab.com/sb9945614/qtm-gitlab-component/[email protected]
    inputs:
      stage: test
      project: "Aerospace Flight Control System"
      file_name: "results.xml"
      testing_type: "JUNIT"
      automation_hierarchy: "2"  # Level 2 hierarchy
      instance_url: ${INSTANCE_URL}
      api_key: ${QMETRY_API_KEY}
Hierarchy levels explained:
- Level 1: Top-level test suites (e.g., "All Regression Tests")
- Level 2: Sub-suites (e.g., "Flight Control Tests" under "Regression Tests")
- Level 3: Granular test groups (e.g., "Altitude Hold Tests" under "Flight Control")
15. Multiple test result files
For complex projects with multiple test jobs, you can invoke the component multiple times:
      stages:
  - test

# Unit tests
unit-tests:
  stage: test
  script:
    - npm run test:unit
  artifacts:
    paths:
      - unit-results.xml
    when: always

# Integration tests
integration-tests:
  stage: test
  script:
    - npm run test:integration
  artifacts:
    paths:
      - integration-results.xml
    when: always

# Upload unit test results
include:
  - component: gitlab.com/sb9945614/qtm-gitlab-component/[email protected]
    inputs:
      stage: test
      project: "Aerospace Flight Control System"
      file_name: "unit-results.xml"
      testing_type: "JUNIT"
      testsuite_name: "Unit Tests - Sprint 23"
      instance_url: ${INSTANCE_URL}
      api_key: ${QMETRY_API_KEY}

  # Upload integration test results
  - component: gitlab.com/sb9945614/qtm-gitlab-component/[email protected]
    inputs:
      stage: test
      project: "Aerospace Flight Control System"
      file_name: "integration-results.xml"
      testing_type: "JUNIT"
      testsuite_name: "Integration Tests - Sprint 23"
      instance_url: ${INSTANCE_URL}
      api_key: ${QMETRY_API_KEY}
16. Custom runner tags
For enterprise environments with dedicated runners, specify runner tags:
      include:
  - component: gitlab.com/sb9945614/qtm-gitlab-component/[email protected]
    inputs:
      stage: test
      runner_tag: "production-runners"  # Use specific runner pool
      project: "Aerospace Flight Control System"
      file_name: "results.xml"
      testing_type: "JUNIT"
      instance_url: ${INSTANCE_URL}
      api_key: ${QMETRY_API_KEY}
17. Custom test suite folders
Organize test suites into folders for better project structure:
      include:
  - component: gitlab.com/sb9945614/qtm-gitlab-component/[email protected]
    inputs:
      stage: test
      project: "Aerospace Flight Control System"
      file_name: "results.xml"
      testing_type: "JUNIT"
      testsuite_folder_path: "/Regression/Sprint-23/Flight-Controls"
      instance_url: ${INSTANCE_URL}
      api_key: ${QMETRY_API_KEY}
This creates a folder hierarchy in QMetry:
      Aerospace Flight Control System/
└── Regression/
    └── Sprint-23/
        └── Flight-Controls/
            └── [Your test execution]
18. Advanced field mapping
For enterprise QMetry instances with custom fields, use the testcase_fields and testsuite_fields parameters:
      include:
  - component: gitlab.com/sb9945614/qtm-gitlab-component/[email protected]
    inputs:
      stage: test
      project: "Aerospace Flight Control System"
      file_name: "results.xml"
      testing_type: "JUNIT"
      testcase_fields: "priority=P1,component=FlightControl,certification=DO-178C"
      testsuite_fields: "release=v2.4.0,sprint=23"
      instance_url: ${INSTANCE_URL}
      api_key: ${QMETRY_API_KEY}
This adds custom metadata to test cases and suites for enhanced filtering and reporting.
Part 6: Real-world use cases
Let's explore how organizations across different industries are using this integration to solve critical quality and compliance challenges.
Financial services: Enterprise banking platforms
Leading financial institutions are evolving their engineering practices with integrated DevOps platforms. These organizations face unique challenges when managing test automation at scale.
The challenge for financial services:
- Regulatory compliance: Financial services must maintain detailed audit trails for all testing activities.
- Multiple compliance frameworks: Firms must adhere to FCA, PSD2, GDPR, and internal risk management policies.
- High-frequency deployments: Multiple production deployments are required daily across microservices.
- Zero-tolerance for failures: Banking systems require extremely high reliability.
- Distributed teams: QA teams need real-time visibility across global engineering teams.
The solution: Financial services organizations implementing the QMetry GitLab Component can automate test result uploads across their CI/CD pipelines for:
- Unit tests for hundreds of microservices
- API contract tests for inter-service communication
- End-to-end transaction flow tests
- Security and compliance scanning results
- Performance and load testing results
Example implementation approach:
      # Financial services approach: Separate test uploads by test type
stages:
  - test
  - security
  - report

# Unit tests for payment processing service
unit-tests:
  stage: test
  script:
    - mvn clean test
  artifacts:
    paths:
      - target/surefire-reports/TEST-*.xml
    when: always

# Upload to QMetry with compliance metadata
include:
  - component: gitlab.com/sb9945614/qtm-gitlab-component/[email protected]
    inputs:
      stage: report
      project: "Payment Processing Platform"
      file_name: "target/surefire-reports/TEST-*.xml"
      testing_type: "JUNIT"
      testsuite_name: "Payment Services - Unit Tests"
      testsuite_folder_path: "/Regulatory/FCA-Compliance/Unit-Tests"
      testcase_fields: "compliance=FCA,risk_level=high,service=payments"
      automation_hierarchy: "2"
      instance_url: ${INSTANCE_URL}
      api_key: ${QMETRY_API_KEY}
Potential business outcomes for financial services:
- Significant reduction in manual test reporting time
- Complete audit trail coverage for regulatory reviews
- Real-time visibility for distributed QA teams
- Faster time-to-production with automated quality gates
- Enhanced compliance posture with complete traceability from requirements to test execution
Aerospace flight control testing
Let's explore how an aerospace company might use this integration for critical flight control system testing.
Aerospace software development faces unique requirements and challenges:
- DO-178C compliance: Aviation software must follow strict certification standards
- Complete traceability: Every requirement must link to test cases and execution results
- Audit trails: Regulators require detailed records of all testing activities
- Safety-critical quality: Failures can have catastrophic consequences
- Multiple test levels: Unit, integration, system, and certification tests
The solution: By integrating GitLab CI/CD with QMetry, the aerospace engineering team achieves automated test execution and reporting.
      stages:
  - build
  - unit-test
  - integration-test
  - system-test
  - report

# Build flight control firmware
build-firmware:
  stage: build
  script:
    - make clean
    - make build TARGET=flight-control
  artifacts:
    paths:
      - build/flight-control.bin

# Unit tests (DO-178C Level A)
unit-tests:
  stage: unit-test
  script:
    - make test-unit OUTPUT=junit
  artifacts:
    paths:
      - test-results/unit-tests.xml
    when: always

# Hardware-in-the-loop integration tests
hil-integration-tests:
  stage: integration-test
  tags:
    - hil-test-bench  # Dedicated hardware test environment
  script:
    - ./scripts/deploy-to-test-bench.sh
    - ./scripts/run-hil-tests.sh
  artifacts:
    paths:
      - test-results/hil-tests.xml
    when: always

# System-level certification tests
certification-tests:
  stage: system-test
  tags:
    - certification-environment
  script:
    - ./scripts/run-certification-suite.sh
  artifacts:
    paths:
      - test-results/certification-tests.xml
    when: always
  only:
    - main  # Only run on main branch

# Upload unit test results to QMetry
include:
  - component: gitlab.com/sb9945614/qtm-gitlab-component/[email protected]
    inputs:
      stage: report
      project: "Flight Control System v2.4"
      file_name: "test-results/unit-tests.xml"
      testing_type: "JUNIT"
      testsuite_name: "Unit Tests - DO-178C Level A"
      testsuite_folder_path: "/Certification/DO-178C/Unit"
      testcase_fields: "compliance=DO-178C,level=A,safety_critical=true"
      automation_hierarchy: "2"
      instance_url: ${INSTANCE_URL}
      api_key: ${QMETRY_API_KEY}

  # Upload HIL test results
  - component: gitlab.com/sb9945614/qtm-gitlab-component/[email protected]
    inputs:
      stage: report
      project: "Flight Control System v2.4"
      file_name: "test-results/hil-tests.xml"
      testing_type: "JUNIT"
      testsuite_name: "Hardware-in-Loop Integration Tests"
      testsuite_folder_path: "/Certification/DO-178C/Integration"
      testcase_fields: "compliance=DO-178C,level=A,test_type=HIL"
      automation_hierarchy: "2"
      instance_url: ${INSTANCE_URL}
      api_key: ${QMETRY_API_KEY}

  # Upload certification test results
  - component: gitlab.com/sb9945614/qtm-gitlab-component/[email protected]
    inputs:
      stage: report
      project: "Flight Control System v2.4"
      file_name: "test-results/certification-tests.xml"
      testing_type: "JUNIT"
      testsuite_name: "System Certification Tests"
      testsuite_folder_path: "/Certification/DO-178C/System"
      testcase_fields: "compliance=DO-178C,level=A,certification_ready=true"
      automation_hierarchy: "1"
      instance_url: ${INSTANCE_URL}
      api_key: ${QMETRY_API_KEY}
The results
Before integration:
- QA engineers manually exported test results from GitLab
- Imported results into QMetry through UI uploads
- Process took 2-3 hours per test cycle
- Human error risk in data entry
- Delayed feedback to stakeholders
After integration:
- Test results automatically flow from GitLab to QMetry
- Complete audit trail from commit → test → result
- Zero manual intervention required
- Real-time visibility for certification auditors
- Compliance reports generated automatically
Example QMetry dashboard after integration:
      ╔════════════════════════════════════════════════════════════╗
║  Flight Control System v2.4 - Test Execution Dashboard     ║
╠════════════════════════════════════════════════════════════╣
║                                                            ║
║  📊 Test Execution Summary (Last 7 Days)                   ║
║  ───────────────────────────────────────────────────────── ║
║  ✓ Total Tests Executed: 1,247                             ║
║  ✓ Passed: 1,241 (99.5%)                                   ║
║  ✗ Failed: 6 (0.5%)                                        ║
║  ⏸ Skipped: 0                                              ║
║                                                            ║
║  📁 Test Suite Organization                                ║
║  ───────────────────────────────────────────────────────── ║
║  └─ Certification/                                         ║
║     └─ DO-178C/                                            ║
║        ├─ Unit/ (487 tests, 100% pass)                     ║
║        ├─ Integration/ (623 tests, 99.2% pass)             ║
║        └─ System/ (137 tests, 100% pass)                   ║
║                                                            ║
║  🔗 Traceability                                           ║
║  ───────────────────────────────────────────────────────── ║
║  Requirements Covered: 342/342 (100%)                      ║
║  Test Cases Linked: 1,247/1,247 (100%)                     ║
║  GitLab Pipeline Executions: 47 (automated)                ║
║                                                            ║
║  ⚠️  Action Items                                          ║
║  ───────────────────────────────────────────────────────── ║
║  • 6 failed tests require investigation                    ║
║  • Last execution: 2 minutes ago (Pipeline #1543)          ║
║  • GitLab Commit: a7f8c23 "Fix altitude hold logic"        ║
║                                                            ║
╚════════════════════════════════════════════════════════════╝
Compliance and audit benefits
Both financial services and aerospace organizations can leverage this integration for compliance:
For financial services (FCA, PSD2, SOX):
- Automated traceability: Link regulatory requirements → test cases → execution results → GitLab commits
- Audit-ready documentation: Complete test execution history with timestamps and pipeline references
- Risk management: Real-time quality dashboards for risk assessment
- Regulatory reporting: Generate compliance reports directly from QMetry test data
For aerospace certification (DO-178C, DO-254):
- Automated traceability matrix: QMetry links requirements → test cases → execution results → GitLab commits
- Immutable audit trail: Every test execution is timestamped with pipeline ID, commit SHA, and executor
- Certification package generation: QMetry generates compliant documentation pulling data from GitLab pipelines
- Real-time compliance dashboards: Auditors can view test coverage and execution history in real-time
Complete configuration reference
Here's a comprehensive reference of all available component inputs:
| Input Parameter | Required | Default | Description |
|---|---|---|---|
stage | No | test | GitLab CI/CD stage for the upload job |
runner_tag | No | "" | Specific runner tag to use (empty = any available runner) |
project | Yes | - | QMetry project name or key |
file_name | Yes | - | Path to test results file (relative to project root) |
testing_type | Yes | - | Test result format: JUNIT, TESTNG, NUNIT, etc. |
skip_warning | No | "1" | Skip warnings during import ("1" = skip, "0" = show) |
is_matching_required | No | "false" | Match existing test cases by name ("true" or "false") |
testsuite_name | No | "" | Name for the test suite in QMetry |
testsuite_id | No | "" | Existing test suite ID to append results to |
testsuite_folder_path | No | "" | Folder path for organizing test suites (e.g., /Regression/Sprint-23) |
automation_hierarchy | No | "" | Hierarchy level for test organization ("1", "2", "3", etc.) |
testcase_fields | No | "" | Custom fields for test cases (comma-separated: field1=value1,field2=value2) |
testsuite_fields | No | "" | Custom fields for test suites (comma-separated: field1=value1,field2=value2) |
instance_url | Yes | - | QMetry instance URL (store in CI/CD variable) |
api_key | Yes | - | QMetry API key (store in CI/CD variable, masked) |
Best practices for production use
As you scale your integration, follow these best practices:
Security
- ✅ Always use CI/CD variables for sensitive data (API keys, URLs)
- ✅ Mask and protect API key variables
- ✅ Rotate API keys periodically (quarterly recommended)
- ✅ Restrict API key permissions to minimum required (write to test results only)
- ✅ Use protected branches for production test uploads
Performance
- ✅ Keep test result files reasonable size (< 10 MB recommended)
- ✅ Split large test suites into multiple jobs/files
- ✅ Use parallel test execution to reduce pipeline duration
- ✅ Cache dependencies to speed up test execution
Organization
- ✅ Use consistent naming conventions for test suites and folder paths
- ✅ Leverage custom fields for filtering and reporting
- ✅ Create folder hierarchies that mirror your test strategy
- ✅ Document your integration in project README files
Troubleshooting
- ✅ Review job logs for API communication details
- ✅ Verify test result file format matches
testing_typeparameter - ✅ Check QMetry project exists and API key has access
- ✅ Ensure test result files are available as pipeline artifacts
Summary and next steps
Congratulations! You've successfully integrated GitLab CI/CD with QMetry Test Management Enterprise. Your setup now provides:
- Automated test result uploads – No more manual exports and imports
- Real-time visibility – QA teams see results immediately after pipeline execution
- Complete traceability – Link GitLab commits, pipelines, and test executions
- Enhanced compliance – Maintain audit trails for regulated industries
- Scalable quality processes – Support growing test suites without added overhead
What happens now
Every time your GitLab pipeline runs:
- Tests execute and generate result files.
- The QMetry component automatically uploads results to your instance.
- QA teams, stakeholders, and auditors see results in QMetry dashboards.
- AI-powered insights analyze execution patterns and identify improvements.
- Compliance reports generate automatically with full traceability.
Expand your integration
Now that you have the basic integration working, consider these advanced scenarios:
- Bi-directional integration: Use QMetry's API to trigger GitLab pipelines from test management workflows.
- Multi-project deployments: Scale the component across your organization's GitLab projects.
- Custom reporting: Build dashboards combining GitLab pipeline metrics with QMetry test analytics.
- Scheduled test execution: Use GitLab scheduled pipelines to run regression suites nightly.
Learn more and get help
Documentation and resources
- Component documentation: GitLab CI/CD Catalog
- QMetry documentation: QMetry Support Portal
- SmartBear resources: SmartBear Academy
- GitLab CI/CD documentation: GitLab CI/CD Documentation
Support
For component technical questions:
- Visit the component repository.
- Open an issue on the project.
- Check existing issues for common questions.
For QMetry product questions:
- Contact SmartBear support at [email protected].
- Visit the QMetry Community Forum.

More to explore
View all blog posts

We want to hear from you
Enjoyed reading this blog post or have questions or feedback? Share your thoughts by creating a new topic in the GitLab community forum.
Share your feedback